With every new hire, compiling the necessary paperwork and designing new offer letters can be time consuming.
Having a proper offer letter for each candidate enhances the new hire experience and helps determine how a candidate will feel as they consider your company.
In order to personalize and fine tune each offer letter, many HR professionals are losing time during their day to create them from scratch.
In fact, on average, HR professionals spend an average of 30 minutes on each offer letter.1
As with any department, it’s crucial to your business success that your processes allow for maximum productivity.
For your HR team, that means lifting their administrative burden via standardized materials and integrated workflows they can count on.
With customizable templates and streamlined approval processes at PandaDoc, you’re able to create compelling offer letters in minutes so you never lose the best candidates.
Below, we’re diving into how you can seamlessly scale multiple offer letters that leave lasting impressions with our pre-approved templates.
Maximizing efficiency with each offer letter
With PandaDoc’s plug-and-play templates, you’re able to generate customized offer letters in just a few minutes, not 30.
This not only saves time but also ensures consistency and compliance.
Here’s how you can do it:
Choosing templates and setting roles
Now you can spend more time on talent and less on paperwork with custom templates you can easily tailor for maximum efficiency.
With custom roles, you can easily allow or restrict access rights to the users of your HR workspace and ensure legal compliance and confidentiality, as well.
Once you’ve selected a pre-approved template such as our Offer Letter Template, you’re ready to get started with roles and variables to quickly customize and send your document.
You can also seamlessly pull data directly from your ATS, such as Greenhouse — more on that below.
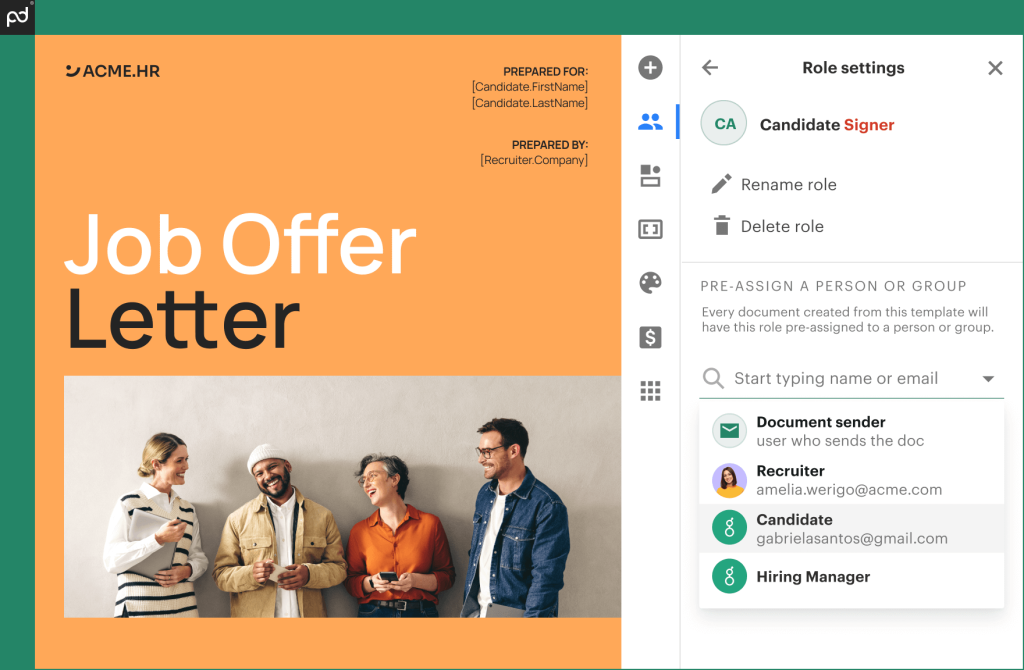
With roles, you can easily add in the candidate, hiring manager, and recruiter to your document to complete more offer letters in less time.
Let’s take a closer look at how these features work.
In PandaDoc, roles can help simplify the document creation process and save time.
They can act as placeholders for future recipients, such as a client, decision-maker, or sender.
Leveraging variables in your offer letter
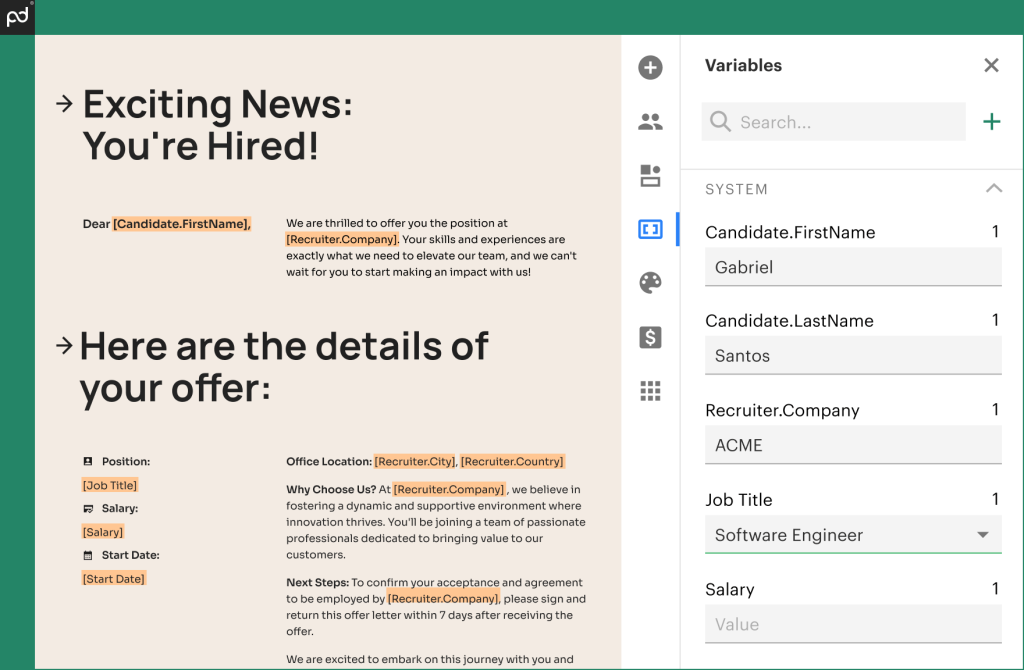
Variables in your PandaDoc document can automatically populate dynamic information about recipients, such as their contact information.
A variable is a merge field designed to save you time by auto-filling any information that frequently occurs in your documents.
It’s a piece of text surrounded by square brackets, such as “[Candidate.FirstName]” on the right side within the following screenshot:
Here’s how to get started with adding variables to your offer letter template or document:
- First, within a template or document in PandaDoc, select a text block where you’d like to place your variable.
- Next, type an opening square bracket “[” and either choose the name of a variable from the dropdown or type your own and press Enter. Next, click the Copy icon to copy the variable name, and paste it where you need it in your template or document.
- If you’d prefer, you can also select Variables on the right hand side of your screen and select + to enter a variable name, then press Enter. This will allow the variable to display in the section you’re working on.
You can simply copy and paste your variables anywhere throughout a document to quickly add repetitive fields and send.
If you’re eager to customize your offer letter further with variables within the title of your document, you can easily do so by typing with square brackets “[” and selecting one of your variables to insert in the title.
And just like that, within a matter of minutes, you have a customized offer letter for your new hire.
Leveraging the PandaDoc integration with Greenhouse Recruiting
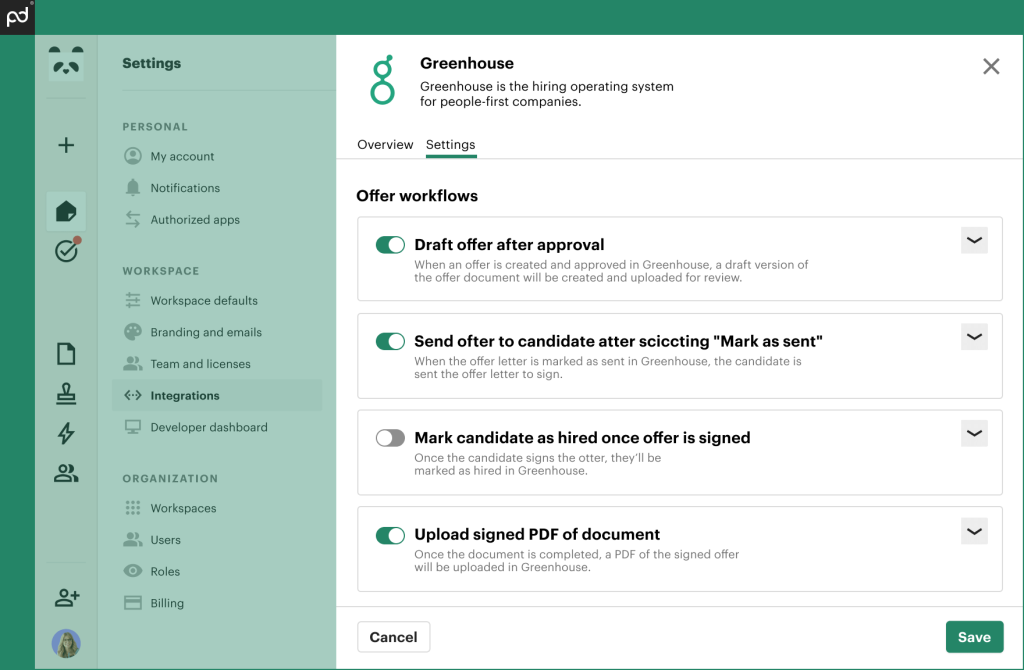
Let’s take it one step further and see how easy it is to automate this directly from your ATS to standardize your offer document workflow.
Once you have a document and/or template ready, you can navigate to Apps on the right hand side of your screen and select Extensions.
From here, you can select any of your existing ATS, including Greenhouse.
You’re able to map any candidate’s Greenhouse object to the PandaDoc candidate recipient role, which will allow you to populate the candidate’s contact information automatically.
Ready to add this capability for your hiring manager and recruiter roles too?
Easily map them using the same workflow whenever you add a candidate to your document:
- After drafting an offer in Greenhouse for a candidate, navigate to Documents > Templates in PandaDoc
- Select your integrated offer template
- Click Use this template
Populating the right policies and content
PandaDoc’s Smart Content feature automatically incorporates the correct policies, benefits, and compensation details based on the role, location, and other relevant criteria within every document.
Now you can personalize the employee experience by automatically populating content such as text, pictures, and videos based on the employee location, role, or other criteria.
This ensures that each offer letter is tailored to the candidate, and always compliant with company policies and any legal considerations.
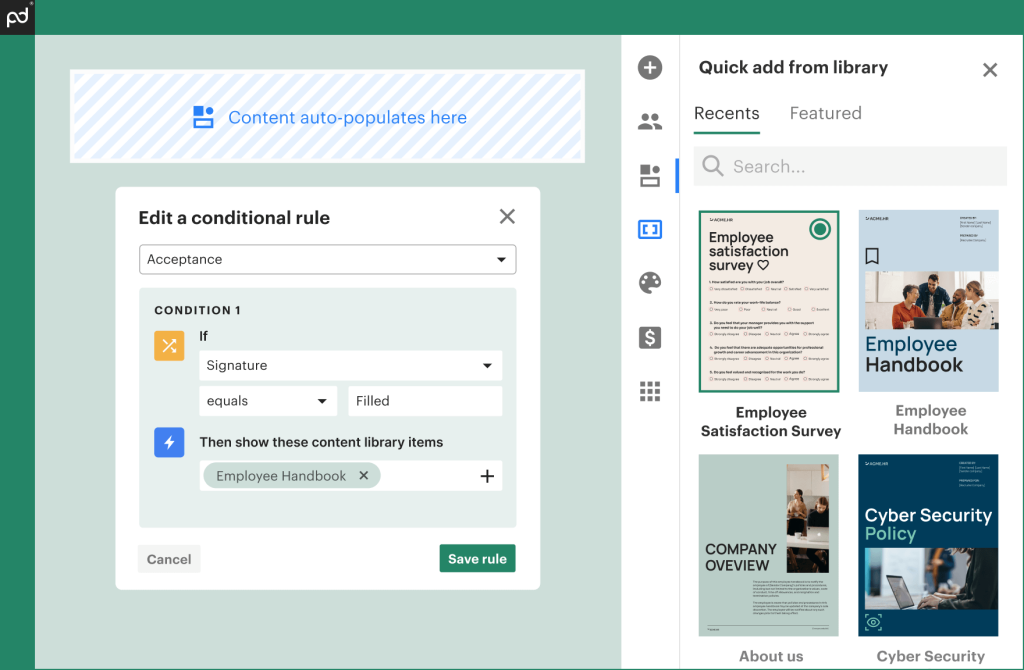
Once your offer letters are fully automated, you’re ready to quickly receive approval on compensation packages.
Pulling the right policies and content automatically
The approval process can often be a bottleneck in the offer letter workflow.
PandaDoc simplifies this by allowing you to configure approval workflows within the platform.
This ensures that all necessary approvals are obtained quickly and efficiently.
It only takes a few simple steps to get started.
Here’s how it works:
- Once you have your template complete, you can navigate to the right hand side of your screen and select Manage roles to toggle the Approval required section on. This will ensure documents are fully approved before being sent to recipients.
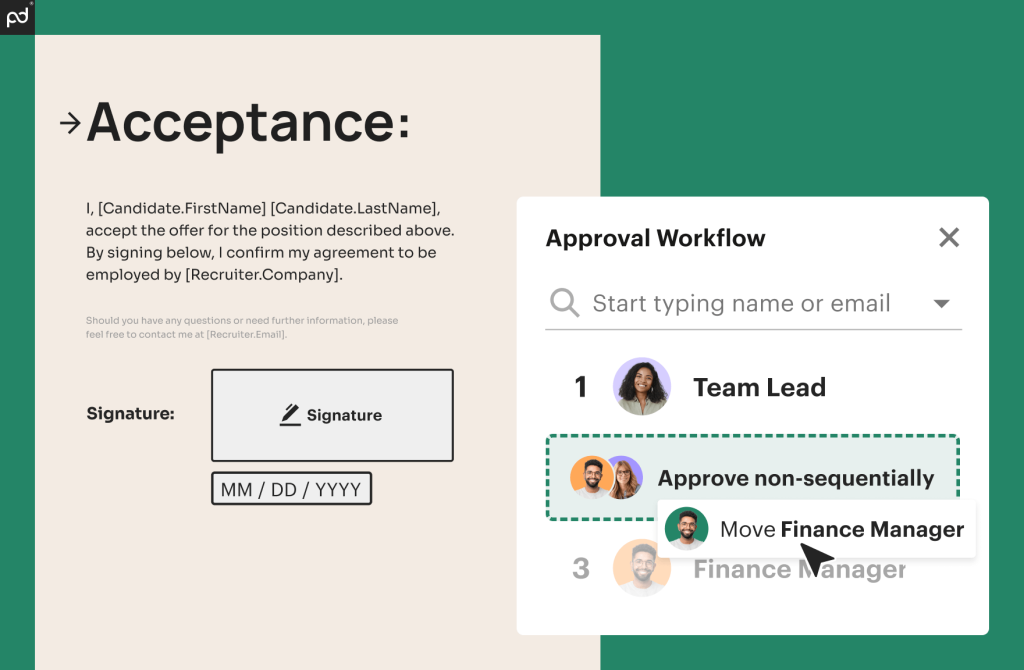
- To add an approver, you can easily get started by typing their name or email address in the pop-up on the right hand side of your screen. To add a group of approvers, click +Add approver group, give it a name, and add your approvers.
Always make sure to select Save once finished between each approval.
You can keep cross-functional collaboration across different departments running smoothly with enterprise workflow automation, as well.
Team leaders throughout your company can connect and offer real-time feedback on your offer letter, so no document gets approved without cross-team approval.
Now comes the final part: signing.
Setting a signing order offers additional structure and security to your document workflows by ensuring your documents are approved by the right people in the proper order, so there’s no risk of miscommunication or confusion.
Let’s take a look at how PandaDoc gets that done.
Ensuring a smooth signing process
A smooth signing process is crucial for a positive candidate experience.
PandaDoc allows you to control the signing order, ensuring clarity and efficiency.
This will help ensure hiring managers are signing before the candidate every time.
- Start by opening your offer letter and selecting Manage at the top of your scroll or on the right side of your screen next to Roles.
- Make sure you set the signing order toggle on. This will allow you to add a signing order as needed within your document. You can arrange roles (or recipients) by dragging them into the order you’d like them to receive a document.
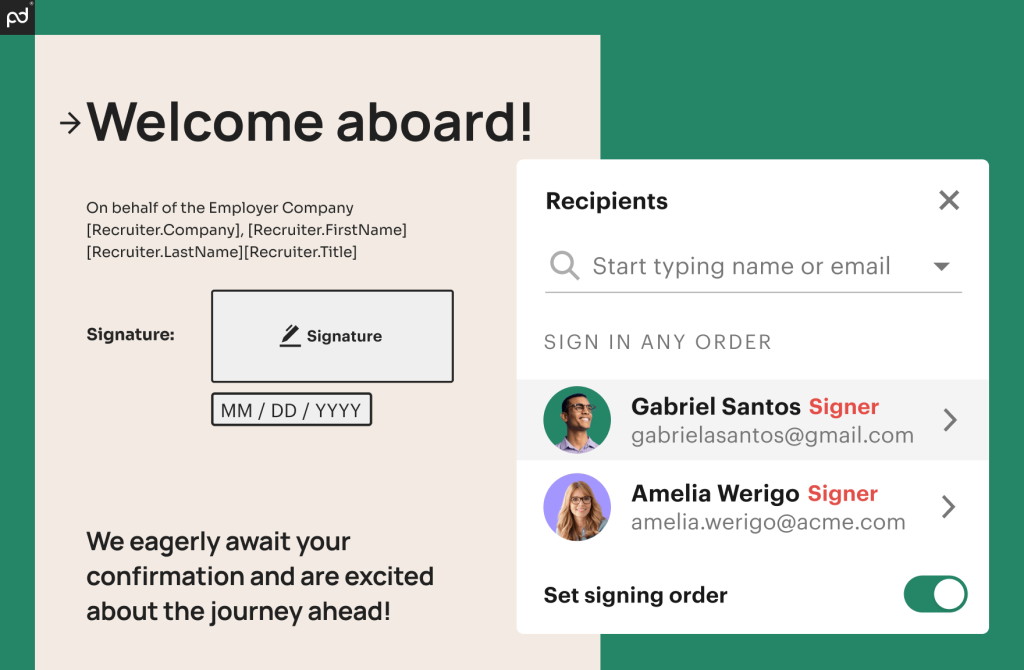
- If you’d like specific recipients to sign a document simultaneously, you can group them by dragging one role or recipient over another. This way, you can combine sequential and non-sequential signing options as necessary.
After a document has been sent, you still have the flexibility to change the signing order for recipients who haven’t yet received the document.
After you’ve set a signing order, your offer letter is ready to send.
Set up a distribution list so that your documents get to the people with appropriate levels of access and responsibility:
- Click and drag recipients in the order you want them to receive a document. Modify a list by adding or removing recipients, assigning roles to them, and customizing their personal information.
- You can set up email notifications to decide the order in which recipients get email notifications. When you place a cc role before a signer role, both will get an email with the document simultaneously. By placing a cc role after a signer role, the cc role is notified after the document is signed.
Once you set up a signing order and distribution list and hit Send document, the document will automatically be sent out to recipients one by one.
Checking your email notifications enables you to stay up to date with the document signing process and ensure that no part of the process falls through the cracks.
Keeping track of the candidate’s engagement
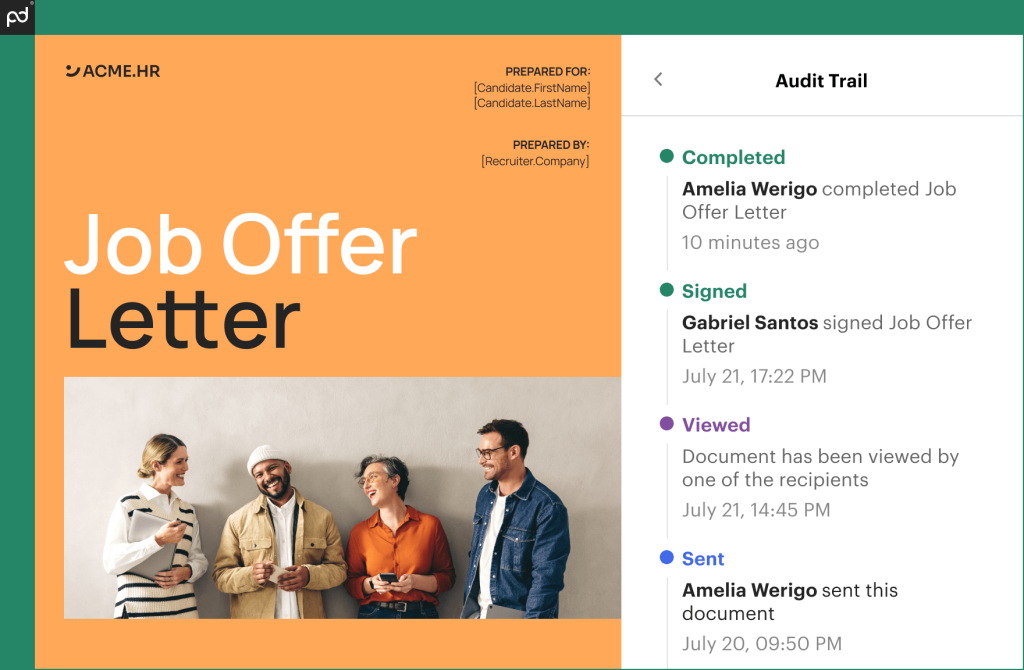
With PandaDoc, you can know with just a glance who’s received, filled out, or eSigned your offer letter in real time.
With features such as auto reminders and notifications, you’ll stay updated — even on the go if you’re using PandaDoc Mobile.
All recipient activity is tracked by PandaDoc as well, so you not only create a perfect audit trail, but can monitor crucial document metrics as well, such as views, downloads, and link clicks.
You’ll receive automated email notifications the moment your offer letter is opened and completed by a candidate.
These notifications allow you to stay on top of the agreement lifecycle so know exactly when to take action, follow-up, or ping recipients for an update.
Here’s how it works:
- To get started, select your profile image located in the lower-left corner to open Settings, then choose Workspace defaults and auto-reminder settings.
- Here, you can toggle your auto reminders on or off. This setting is enabled by default, but you can easily switch it off and send reminders manually when needed. You can also choose the delivery method for auto reminders, whether you want to send via SMS or email.
You can also set up auto reminders for all templates and documents by selecting your profile image located in the lower left corner of your screen.
If you select Settings, then choose Workspace defaults, you can select auto reminder settings for your template or document.
This feature allows you to toggle auto reminders on and off. It is enabled by default, but you can easily switch it off and send reminders manually when needed.
Now you have real-time visibility into the status of the offer letter.
This allows you to track whether the candidate has opened, viewed, or signed the offer letter.
By keeping track of the candidate’s engagement, you can ensure swift responses and minimize the risk of drop-offs.
This helps to keep the candidate engaged and moving forward in the process.
Automating post-signature tasks
Once the offer letter is signed, there are several post-signature tasks that need to be completed.
PandaDoc allows you to automate these tasks, ensuring a smooth transition from offer acceptance to onboarding.
Start by setting up automations to instantly update candidate records in your ATS.
This ensures that all necessary information is recorded accurately and efficiently.
Easily get started by selecting Automations on the left-hand side of your screen.
Then select +New automation.
You can also open any template you would like to get started with and select Automations on the right panel.
Here are some of the common automations you can leverage:
- Move a document to cloud storage (Microsoft One Drive, Google Drive, Dropbox, and Box)
- Move a document to a PandaDoc folder
- Send another PandaDoc document whenever a document’s status is updated
- Change quote/opportunity/deal stage in Microsoft Dynamics, HubSpot, Salesforce, Zoho, or Zendesk Sell whenever a document’s status is updated
- Update line items in Microsoft Dynamics, Pipedrive, HubSpot, Salesforce, Zoho, or Zendesk Sell whenever a document’s status is updated
- Attach a .pdf in Salesforce, Microsoft Dynamics, HubSpot, Zoho, Pipedrive, BambooHR, Greenhouse, SharePoint, and NetSuite
- Create a record in BambooHR or Greenhouse whenever a document’s status is updated
- Create a note in Microsoft Dynamics
You can also save completed .pdf files to Microsoft One Drive, Google Drive, Dropbox, or Box to organize signed offer letters within designated folders.
This will ensure that all documents are stored securely and are easily accessible.
- To do this, simply select Sent or Completed in the Document status dropdown menu (we suggest selecting Completed to make sure only finalized documents with a signature certificate will be attached).
- Select Authorize > Connect to link your Microsoft One Drive, Google Drive, Dropbox, or Box account to your PandaDoc account.
- Finally, select a folder where documents will be uploaded and easily select the Upload collect files checkbox to attach any documents.
You can also set up automations to trigger onboarding workflows or tax form collection upon offer acceptance.
This creates an efficient, smooth process for your candidate as they become an employee and start contributing to your company.
Start achieving operational efficiency with PandaDoc
Leveraging PandaDoc for sending offer letters can significantly enhance your HR processes.
From creating customized offers and pulling the right policies to gathering approvals and ensuring a smooth signing process, PandaDoc offers a comprehensive solution for HR professionals.
And by keeping track of the candidate’s engagement and automating post-signature tasks, you can provide a smooth and efficient process from start to finish.
