Ready to make your mark and learn how to insert your signature into Google Sheets?
Well, this article will show you how to add a signature to both Google Sheets and Google Docs in simple steps.
Both of these tools are used by thousands of people every day.
They’re super easy to work with and great for collaboration, especially once you learn how to insert a signature in Google Sheets and Docs.
Initially, Google Sheets and Docs were created to help you work with different types of documents, from writing to editing and beyond, online rather than off, such as with Microsoft Word documents or Excel sheets.
But now, times have changed, and today, we can take many more actions with the tools. This is mainly due to the Google marketplace.
Key takeaways
- Google Sheets and Google Docs are both text editing programs.
- But while Sheets is more optimized for data entry and collation, Docs is suited for editing Word documents.
- Leverage PandaDoc—a Google add-on—to insert signature in Google Sheets and Docs.
- Use two-factor authentication and password protection to secure your files on Google Docs and Google Sheets.
- Send signed Google Sheets and Google Doc files faster to Gmail contacts with the PandaDoc Google add-on.
What are Google add-ons?
A Google add-on is a way to add new features and functionality to Google Sheets, Docs, Slides, Forms, Gmail, and more.
Most add-ons are developed by third parties and go through a rigorous Google selection and approval process.
All add-ons run inside your Google tool and look like additional menus, sidebars, and popovers already built-in.
Add-ons allow you to extend the value of your Google Docs investment by letting you do more while not having to open a new window.
You can choose from various Google add-ons to format text or customize styles, set page sizes or add formatted code, and much more.
Luckily, there is also the possibility to easily eSign documents in Google Sheets.
eSignatures and digital signatures
To start, let’s define what eSignatures are, how they can be helpful in your Google account.
So, what are eSignatures?
A signature is often used to prove one’s identity.
Typically, signatures are captured by hand-writing them with a pen and paper.
Now, thanks to technology, we’ve moved from the dark ages to a time when collecting an eSignature on a document is more common, takes only seconds, and is an enjoyable experience.
To put it simply, an eSignature helps you to sign online documents. eSignatures can also be called digital signatures.
While they are basically the same thing, there are a couple of slight differences between the two.
A digital signature is a verified signature on a document that contains an encrypted algorithm with invisible digital codes.
Encryption is the key when it comes to the electronic signature vs digital signature conundrum. Here, you can find more info on how a digital signature works.
Are eSignatures legally binding?
eSignatures are legal in the United States, Canada, Australia, and many other countries.
Be advised, though, that electronic signatures are not yet legal worldwide.

How do I add an eSignature in Google Docs?
PandaDoc is one of the tools that can help add eSignatures to Google Documents.
The best part is you won’t have to open new windows, tabs, or apps to accomplish this.
PandaDoc appears seamlessly in Google Docs, making adding a Google Doc signature quick and easy.
So, let’s get into how to electronically sign a Google Document.
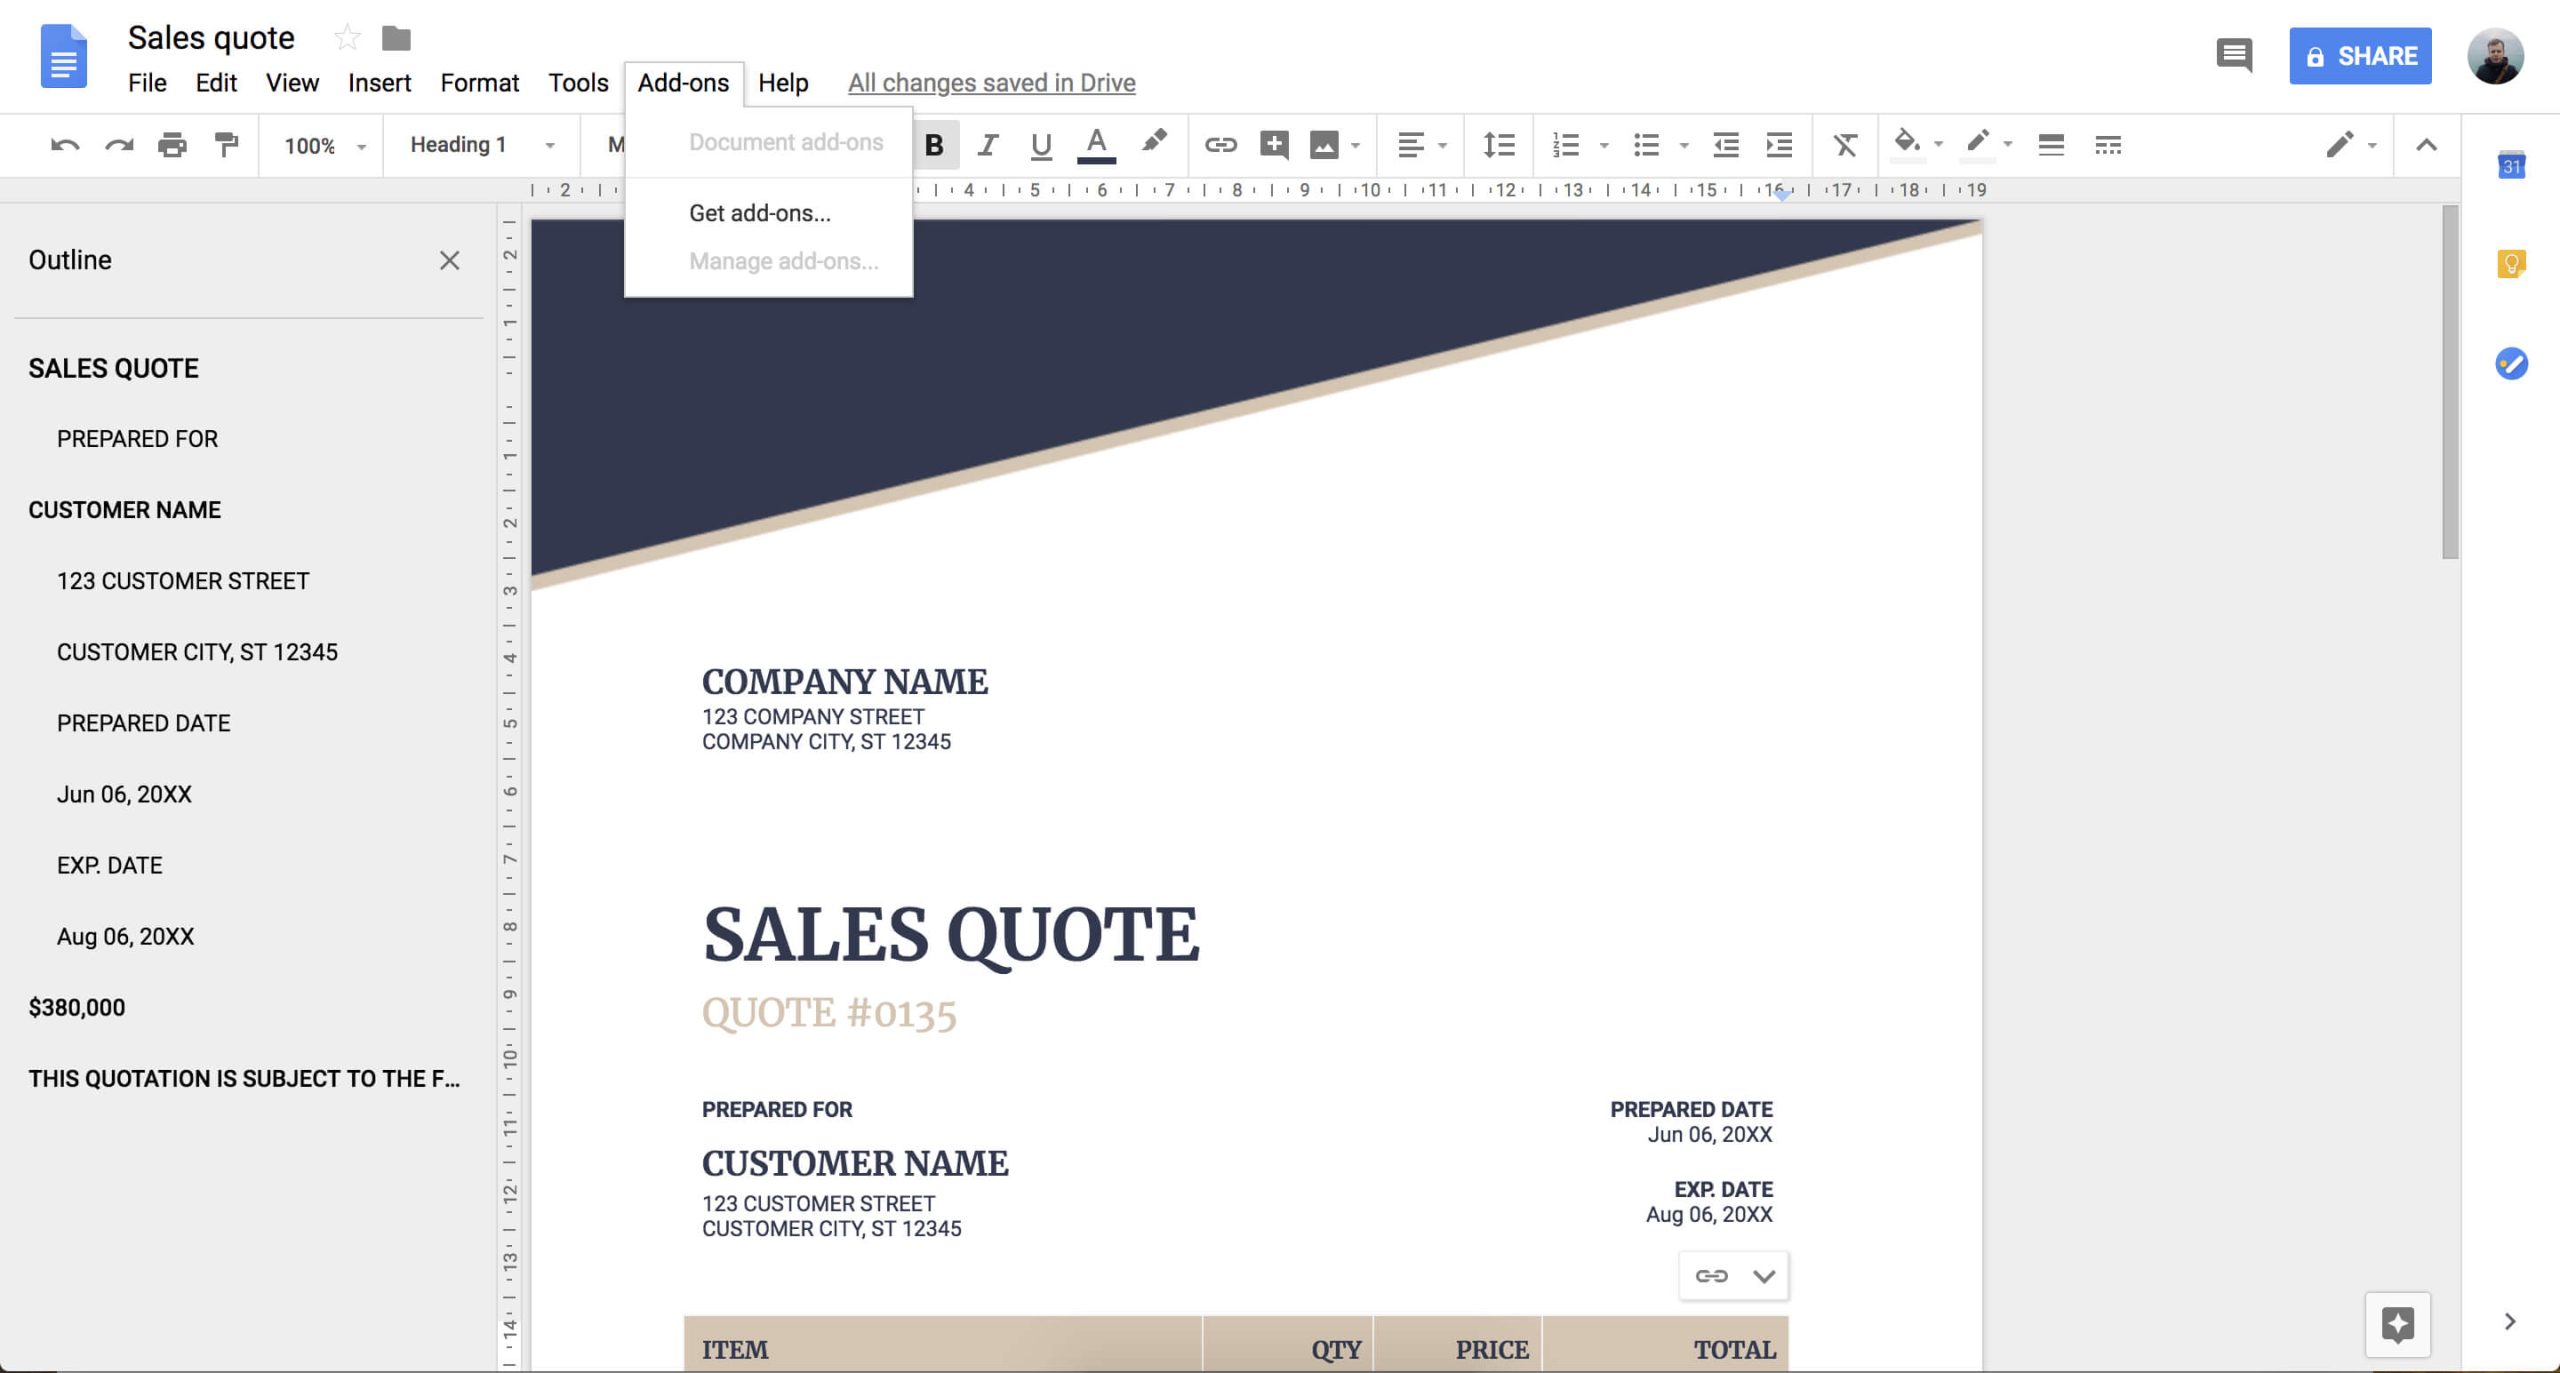
1. To get started, use an existing Google Doc. You could upload a document from your hard drive or Dropbox, or just create a new one.
2. Then click Add-ons > Get Add-ons.
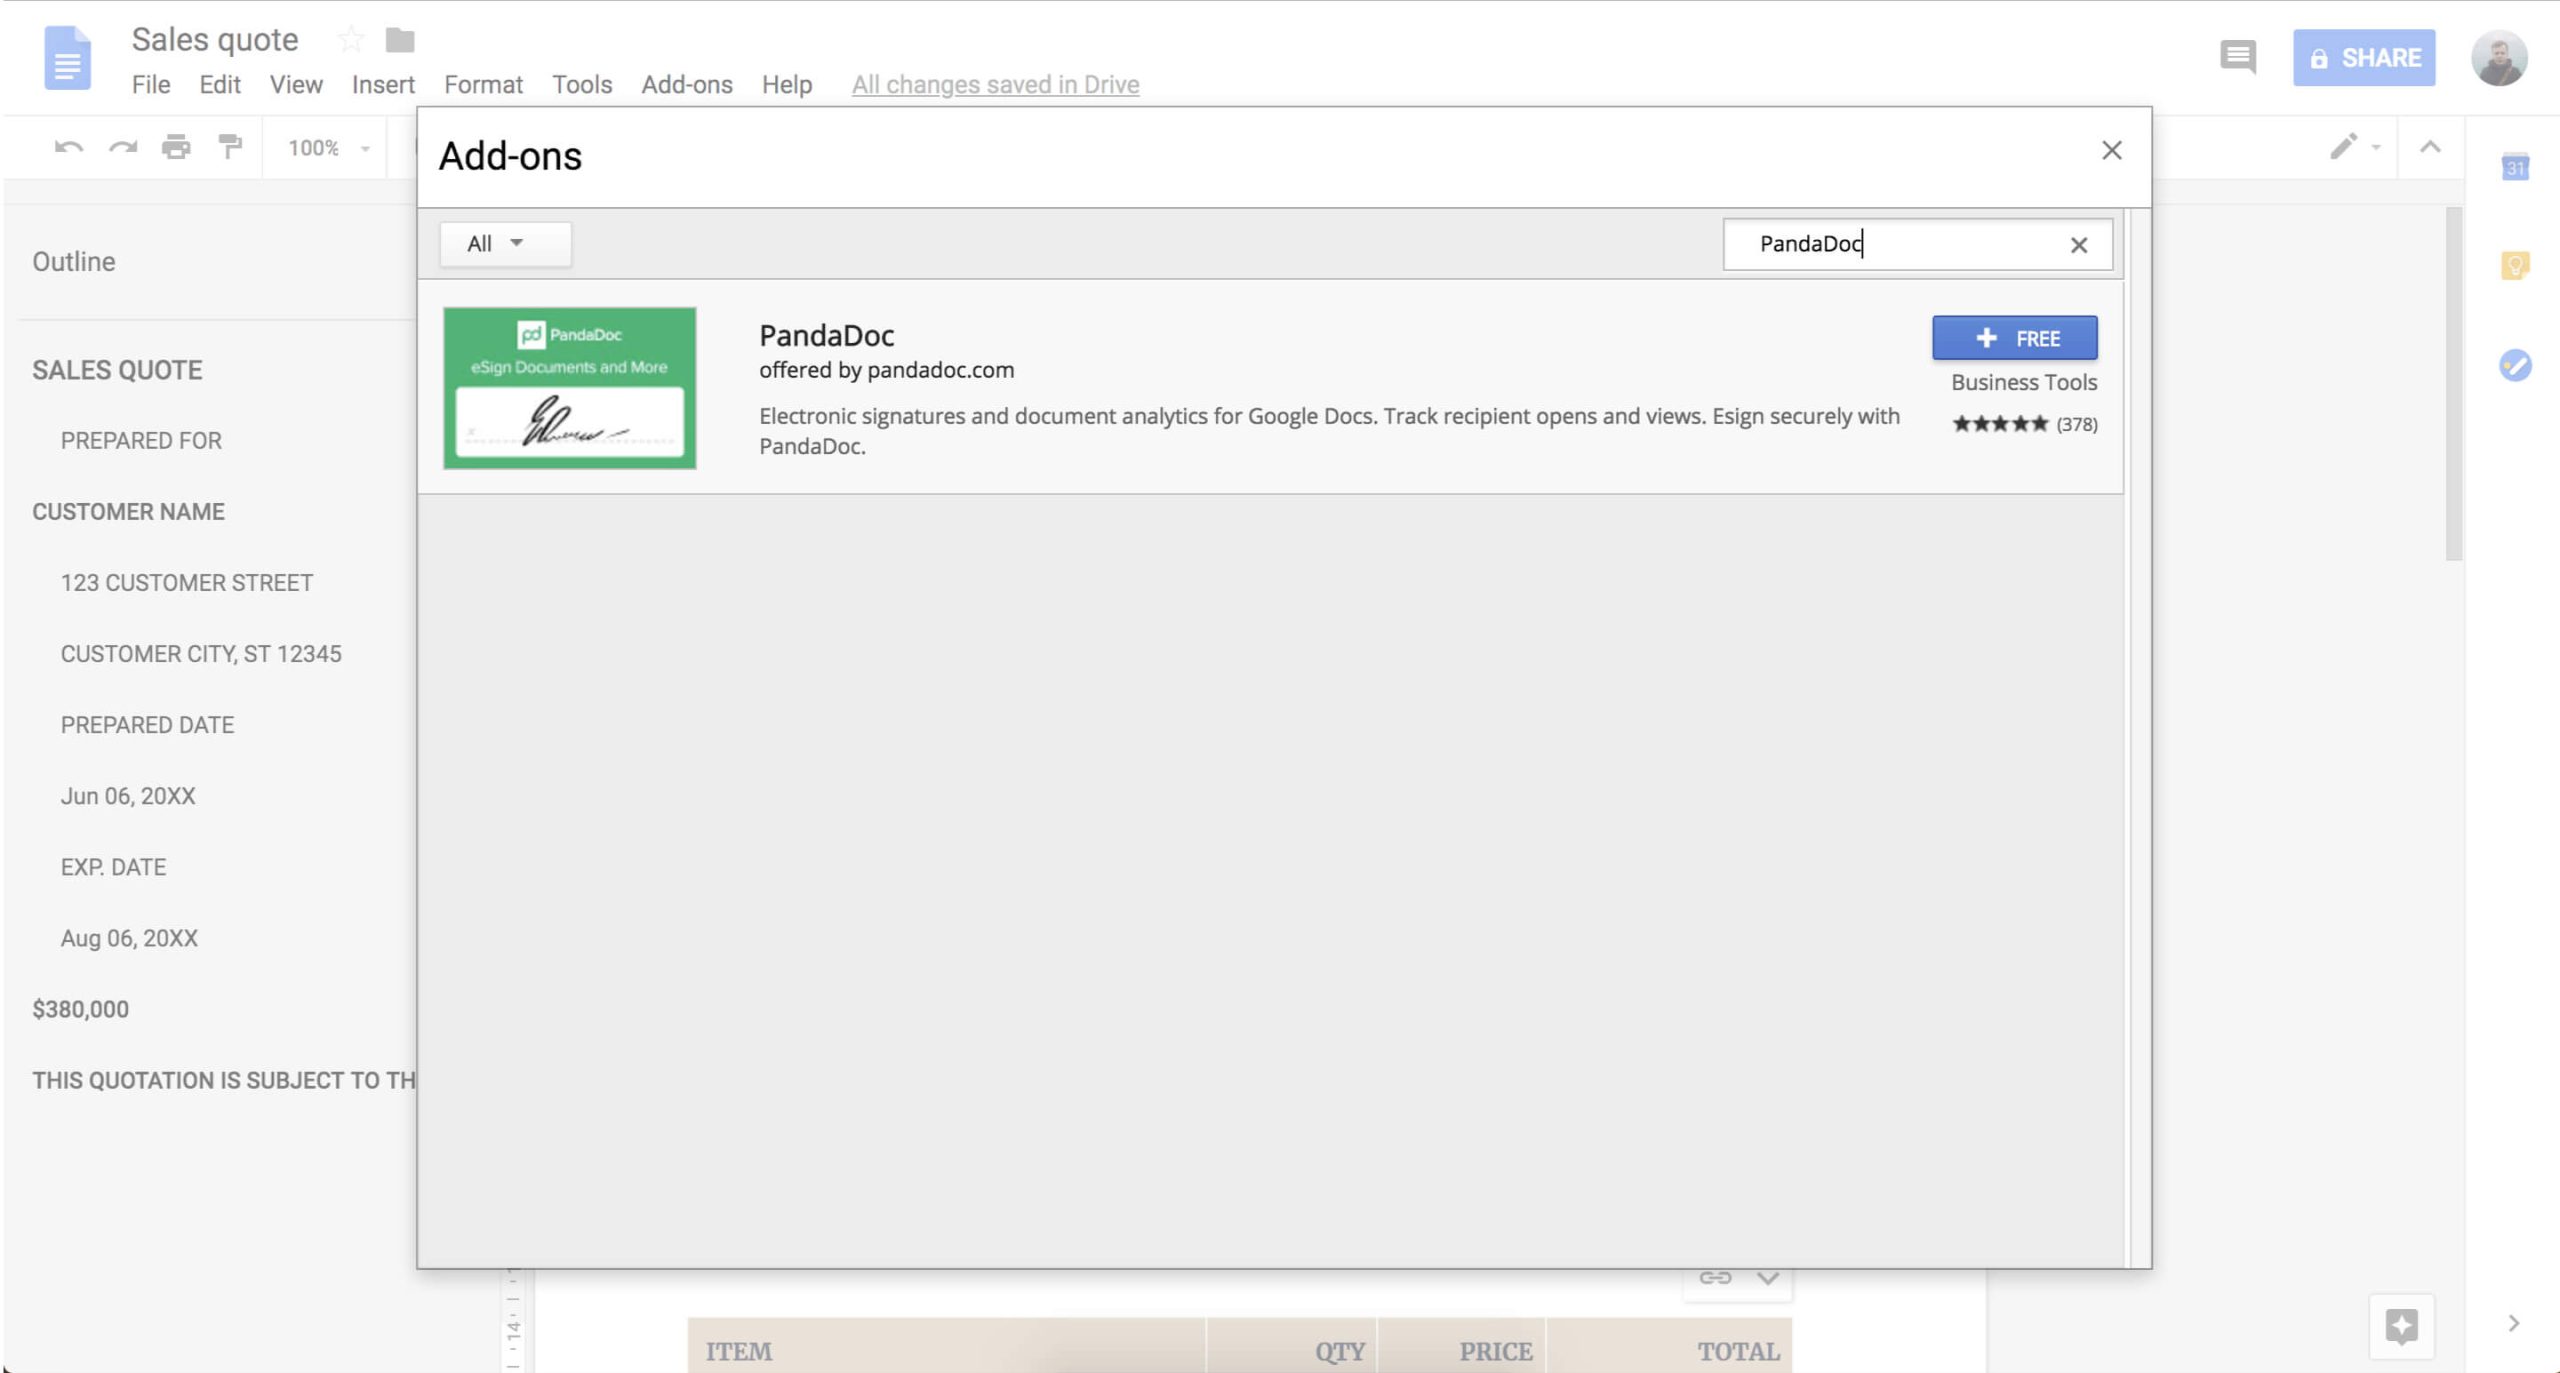
3. Search for “PandaDoc” or scroll down and look for the bright green Sign Docs box. Click on it and select free.
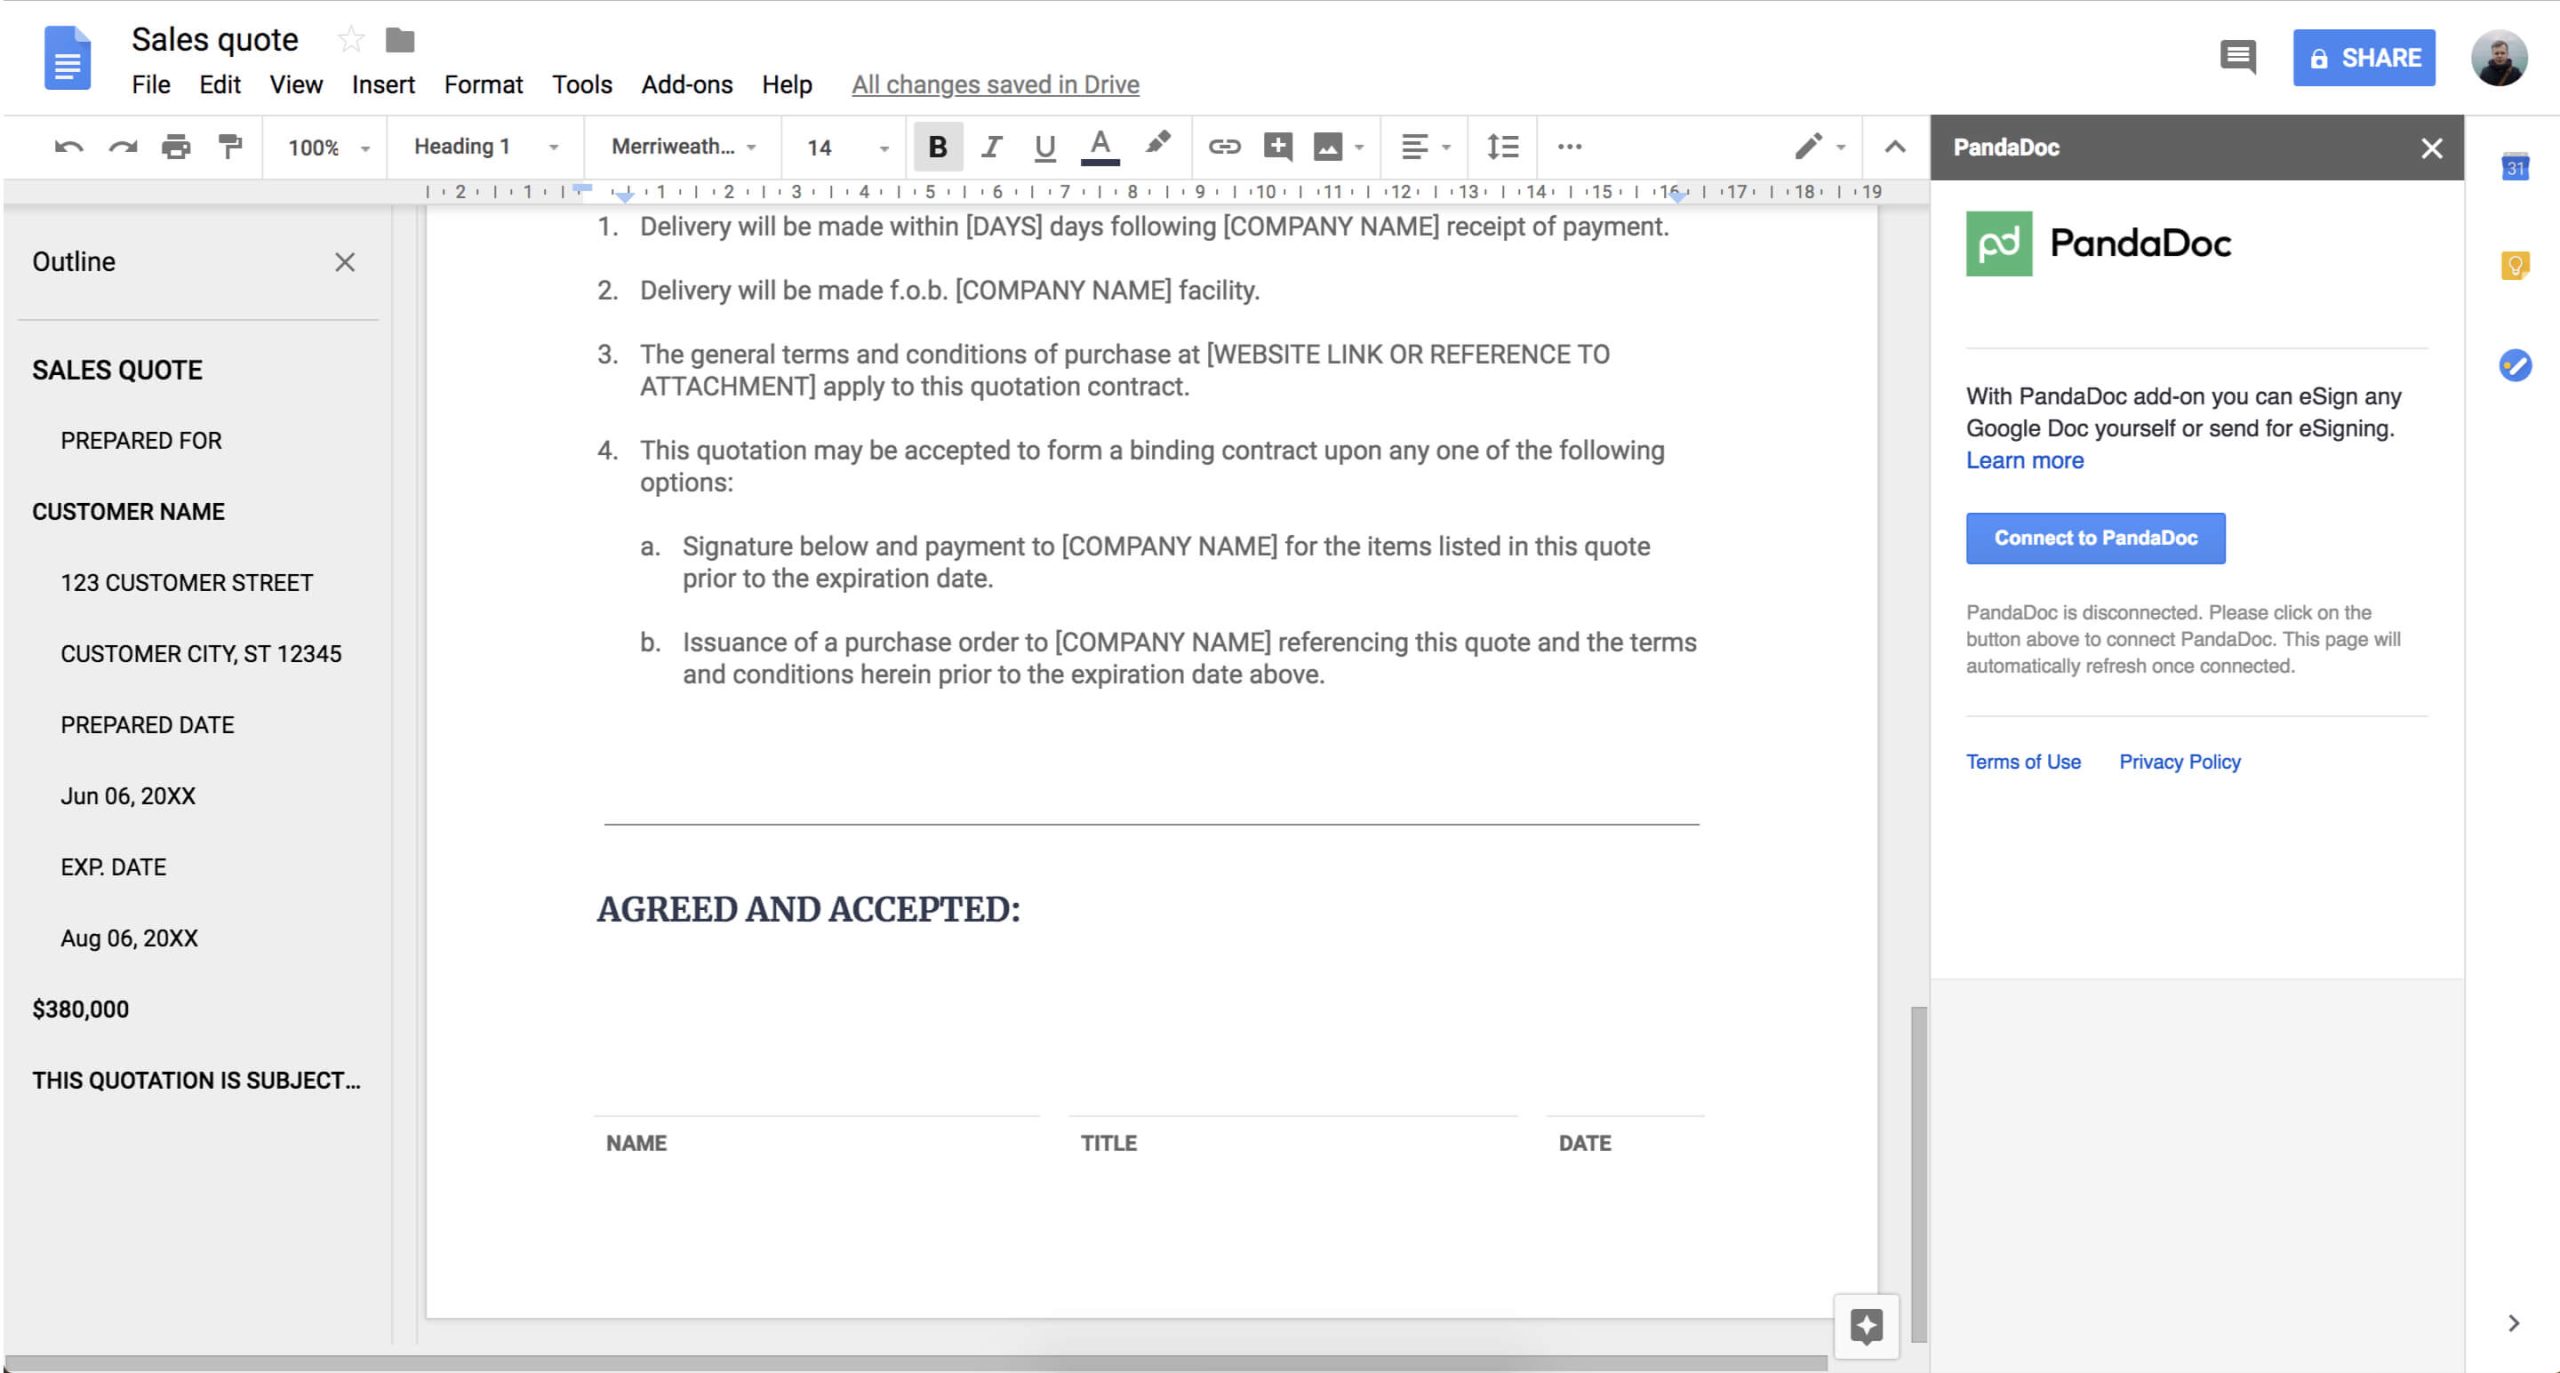
4. Go back into your Google Doc and select Add-ons > PandaDoc > Send via PandaDoc.
5. Now your PandaDoc add-on panel will appear on the right side of the screen. Select Connect to PandaDoc.
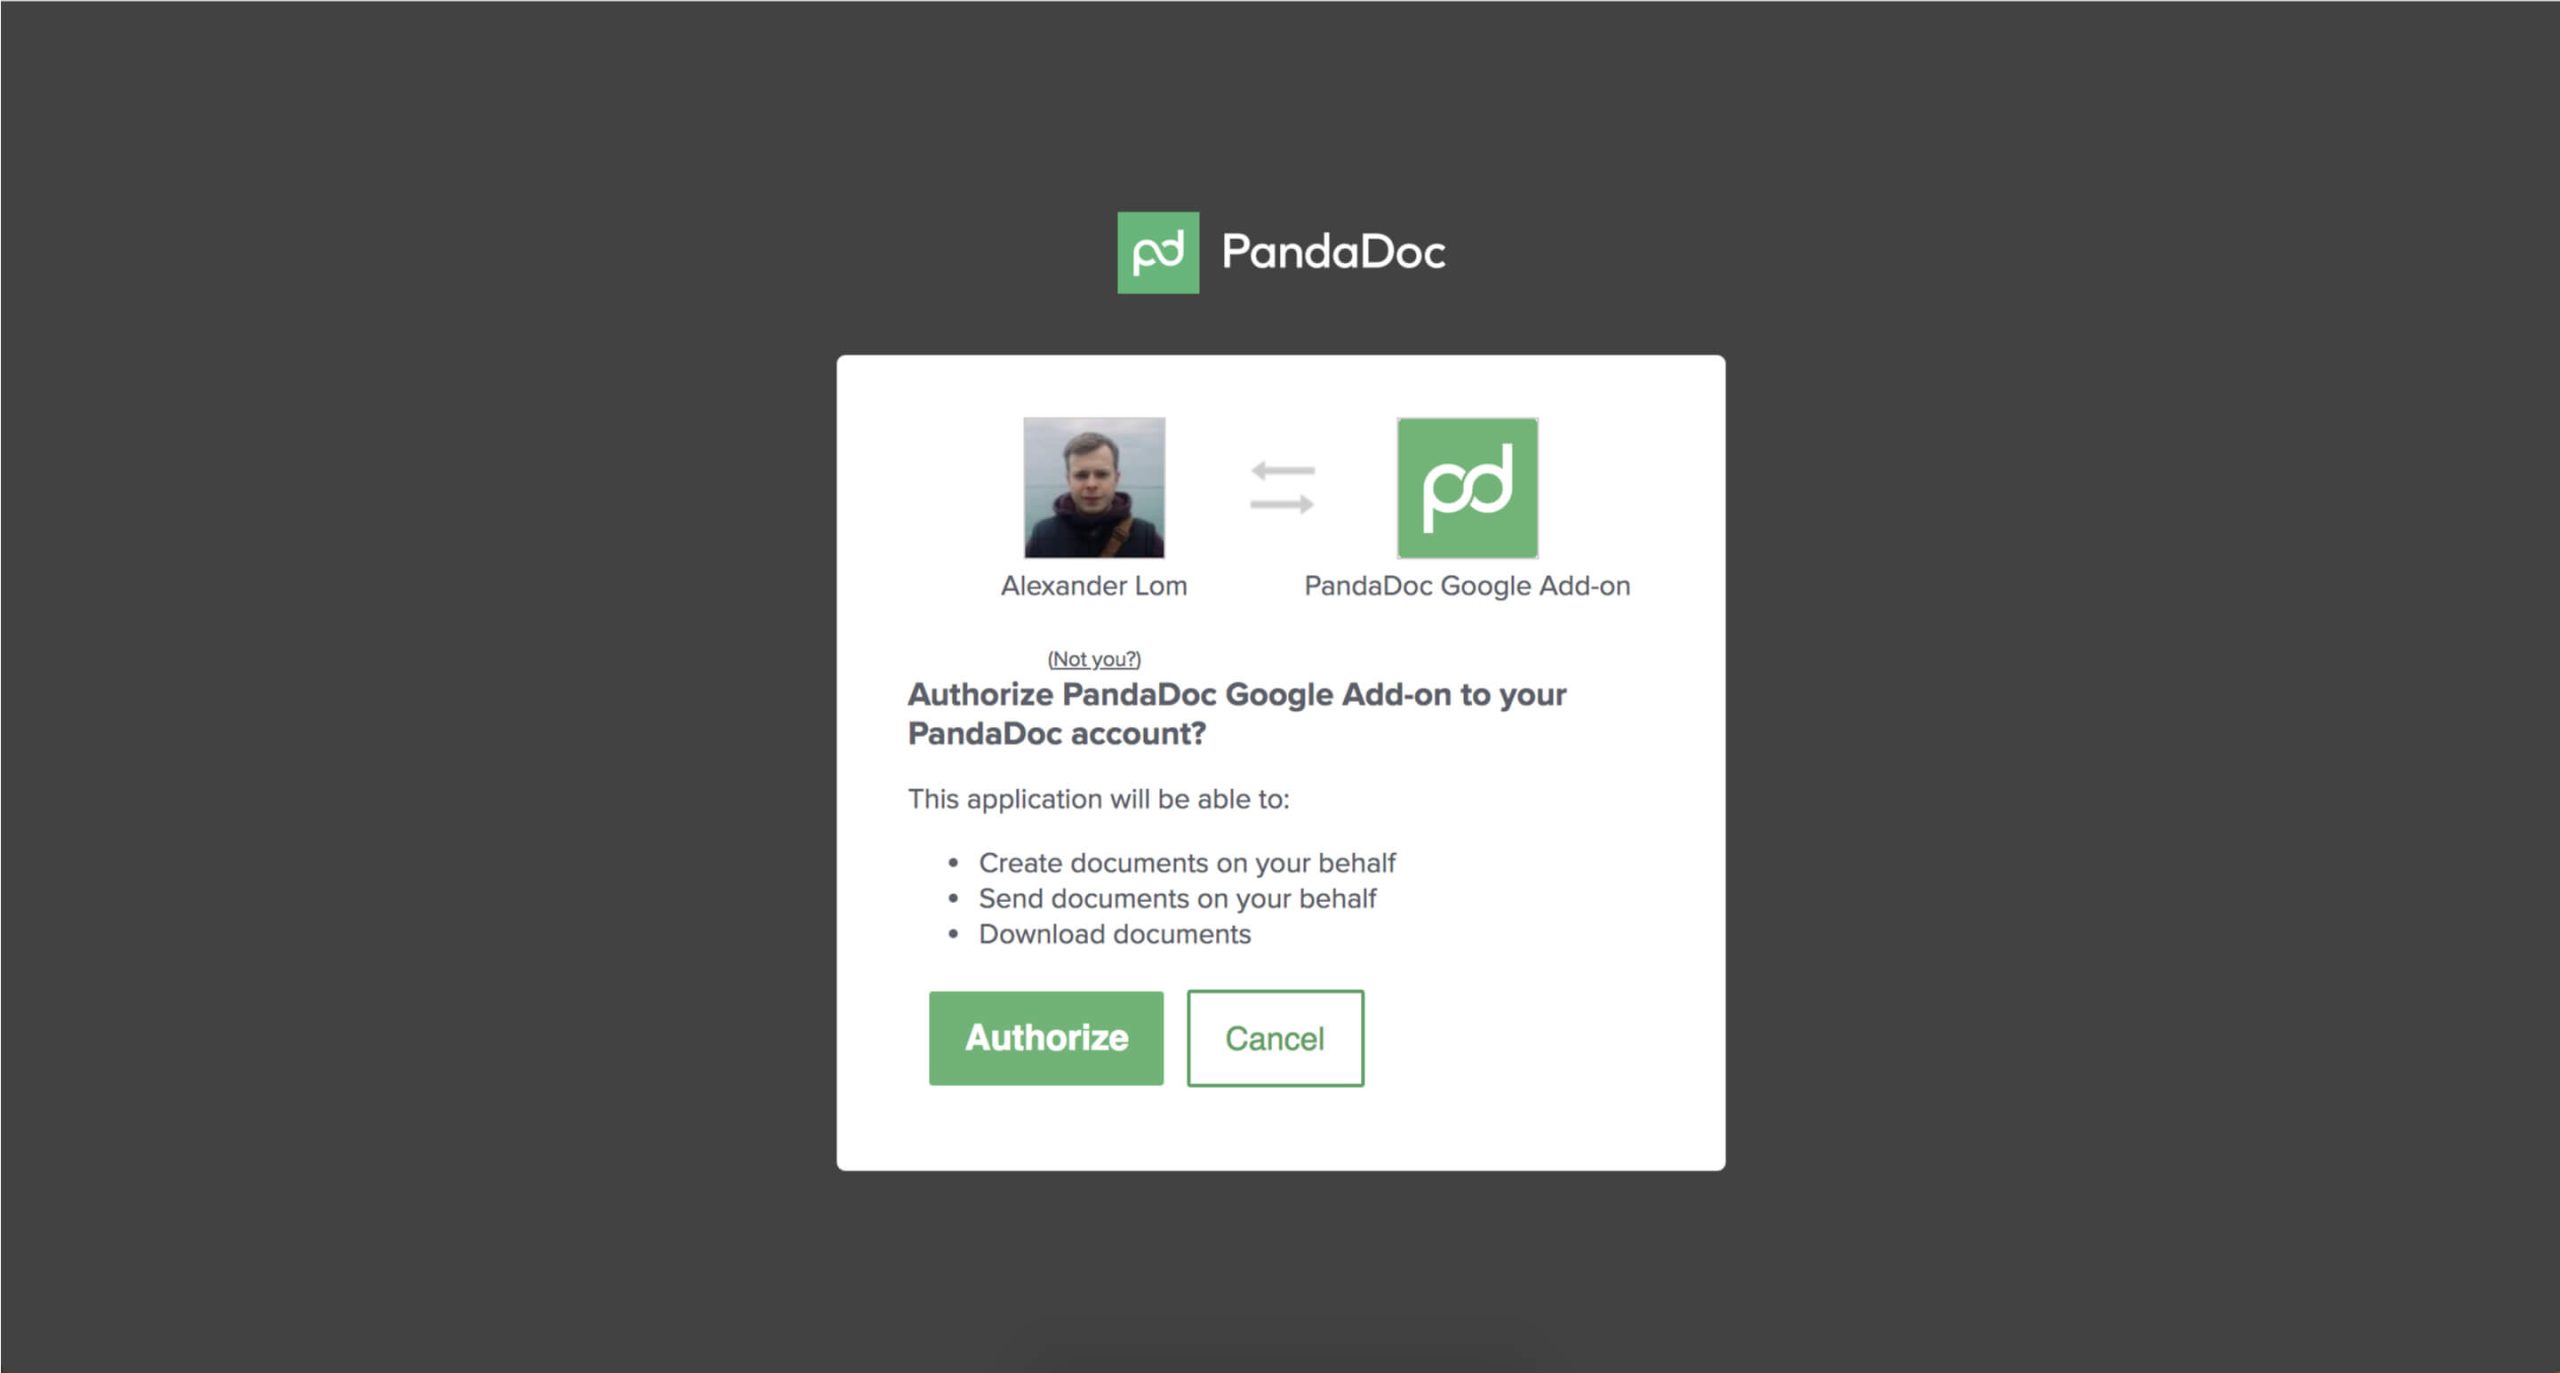
6. Then, hit “Authorize application” in the window that pops up.
7. Now, you’ll find the PandaDoc add-on right inside your Google Docs every time you open the app.
8. Simply go to Add-ons > PandaDoc > Send via PandaDoc any time you’re ready to send a Google Doc for electronic signature and tracking!
How to send your Google Doc via PandaDoc
This step-by-step process easily combines the collaborative editing of Google Docs with the advanced features of PandaDoc for efficient document management and tracking.
- Integration setup: Ensure you have the PandaDoc add-on installed for Google Docs, and authenticate your Google and PandaDoc accounts.
- Open Google Doc: Open the Google Doc you want to send via PandaDoc.
- Access PandaDoc Add-On: Click on “Add-ons” in the Google Docs menu. Select “PandaDoc” and choose “Create Document.”
- Select template or create document: Choose a PandaDoc template or create a new document.
- Edit document in PandaDoc: The document will open in PandaDoc for further editing. Customize fields, add signatures, and make any necessary changes.
- Send via PandaDoc: Once you’re ready, click “Send with PandaDoc” within the PandaDoc interface.
- Recipient details: Enter recipient details, including email addresses.
- Set up document tracking: Choose whether to enable document tracking for insights.
- Send document: Click “Send” to deliver the document to the recipients via PandaDoc.
- Monitor document status: Track document status and receive notifications when recipients interact with the document.
Add signatures to your Google Sheets
Thanks to a Zapier-powered PandaDoc and Google Sheets integration, you can add electronic signatures to your Google Sheets 一 and much more!
Connect as many documents as you like in PandaDoc and Google Sheets without coding.
Once your document is approved, PandaDoc automatically adds eSignature fields and the relevant recipient information to your document based on the data in your spreadsheet.
You can create rules to populate quotes, invoices, proposals, and more automatically when you create them.
When your document status changes in PandaDoc 一, for instance, when viewed, paid for, or signed一your Google spreadsheet automatically updates.
You can even select the exact row and column the changes appear in!
Plus, when you land a new client, their details are automatically saved to the Google spreadsheet of your choice.
Then, when a client inputs data into the fields in your PandaDoc document, the data syncs seamlessly with your Google spreadsheet to update the relevant cells.
You can also create PandaDoc documents using data from several spreadsheets.
Create the appropriate rules and combine data from several sources 一 whether that’s your email list, social media stats, Google Forms, and more.
Test your rules to optimize your PandaDoc and Google Sheets experience, and start signing your Google Sheets with ease.
Be honest, when you wondered about adding digital signatures to Google Sheets, you never thought it would be so easy, did you?
PandaDoc add-on best practices
PandaDoc users can send Google Sheets and Docs via PandaDoc and work with Google Docs signatures, and view document analytics.
From now on, when you send a document via PandaDoc, you can see exactly how long your recipient looked at each section.
This means you can anticipate a prospect’s objections by analyzing where they spent most of their time on the document.
It’s important to take advantage of this feature by breaking up your doc into specific pages.
Here’s how: click Insert > Page Break and add a page break between important sections to understand better what your client is thinking and looking at.
Tips for signing and managing your Google Sheets and Docs securely
Inserting a signature on a Google Sheets or Docs file would mean its contents are of some importance. The following measures can guarantee the security and privacy of important HR documents.
Enable two-factor authentication (2FA)
2FA provides an additional security layer to your Google account.
Once you activate 2FA on your account, you must provide secure codes from your phone, Gmail, or any other pre-specified channel in addition to your password when logging in.
To enable 2FA:
- Go to your Google account settings
- Click on the Security tab
- Find the 2-Step Verification label and click on Get Started
- Follow the prompt to completion.
Due to its extra layer of protection, 2FA makes it difficult for unwanted parties to access your Google Drive—which contains Docs and Sheets projects—even if they have your password.
Control sharing permissions
Sharing your Google sheet or doc with collaborators gives them access to your data or content. As such, you must scrutinize emails before granting access permissions.
Remember that whoever you share your file with may also share it with others intentionally or by mistake. If careless, they may expose classified data in the Sheets or Docs to the public.
You can avoid this by impressing the importance of privacy before granting access to your documents.
An excellent approach is to keep a tight regulation on the document’s accessibility.
As much as possible, restrict access to only necessary collaborators and people you trust. Also, use options like “View,” “Comment,” and “Edit” to control access levels.
- The “View only” option allows the recipient to read through the content without editing or commenting on it. As the name implies, they can only view it. This option is ideal when you only want to show someone the document without letting them modify or copy it.
- The “Comment” option takes it further by allowing the recipient to leave comments on the document. But they can’t modify the content in any way. This option is ideal when you want to get the reader’s opinion without letting them change anything on the document.
- The “Edit option” is popular among collaborators, allowing the viewer to make permanent changes and corrections to the content in the document.
Use password protection and other security features
Google Sheets and Docs have security features that offer advanced document protection.
For example, you can assign a password to protect your Sheets or Docs files. To do that:
- Open the document
- Click File > Info.
- Under Protect document, click Encrypt with password.
- Enter a password and confirm it.
- Click Set password.
You can also track who has accessed a Google Sheet or Doc:
- Open the document
- Click File > See version history.
- Click the “Who has Access” tab.
The prompt will show you a list of everyone who has accessed the document, along with the date and time they did. These security features will help you further prevent unauthorized access to the document.
Update your Google software
You must keep the software you use to access your Google Docs and Sheets up to date.
These include your web browser, desktop, and mobile applications.
Google regularly releases security updates for its programs to make them more secure.
Consequently, out-of-date software will likely have more vulnerabilities that schemers can exploit for attacks.
Practice due diligence before installing add-ons
Add-ons extend the functionality of Google Docs and Sheets to get more out of them.
Developers regularly release different add-ons for these two programs.
But you must know that not all these add-ons are safe to use.
Some add-ons may contain malware or other security risks that may create a vulnerability attackers can exploit to access your document.
You should only install add-ons from trusted developers. Preferably, stick to add-ons and extensions available on Google’s official store.
Otherwise, practice due diligence.
The best way to tell trust-worthy add-ons is through user reviews and ratings.
Carefully examine the reviews on any external program before adding them to Google Sheets and Docs.
Integrate with Gmail before sending Google Docs via PandaDoc
Do you use Gmail?
If yes, save even more time by logging into your PandaDoc account and setting up the contact sync between PandaDoc and your Gmail account.
Go to Settings > Integrations, then Click Connect Gmail.
The next pop-up will ask you to accept the integration.
Finally, the green status bar will display, showing you the process of syncing your contacts from Gmail to PandaDoc.
When the sync is finished, all your contacts will be inside PandaDoc.
This means you can send your signed documents (which you can create using PandaDoc templates) to your Gmail contacts via the PandaDoc Google add-on.
PandaDoc integrations for Google Sheets and Docs
Thanks to PandaDoc integrations, you can add your signature to Google Sheets and Google Docs with ease.
You can also electronically sign Google Forms using PandaDoc.
Track, manage, and edit your PandaDoc documents in your favorite Google apps and take another step toward a paperless, more organized process.
With PandaDoc and Google, you can run your business and close deals anywhere on your laptop, iPhone, or Android device.
Originally published March 11, 2014, updated January 25, 2024
Disclaimer
Parties other than PandaDoc may provide products, services, recommendations, or views on PandaDoc’s site (“Third Party Materials”). PandaDoc is not responsible for examining or evaluating such Third Party Materials, and does not provide any warranties relating to the Third Party Materials. Links to such Third Party Materials are for your convenience and does not constitute an endorsement of such Third Party Materials.
Frequently asked questions on how to digitally sign a Google Doc or Sheet
-
- Original signatures are proof of a document’s authenticity, and they confirm its source.
- Signatures assign responsibility for the document to whoever signs it. Primarily, you’ll be accountable for the contents of a file with your signature on it, and this accountability encourages collaborators to be more transparent and avoid unethical practices.
- Signed documents are legally binding in the United States of America. As such, signatures add to the document’s legal validity. This advantage makes signatures key when sharing Google Docs or Sheets in business and legal contexts.
- Signatures demonstrate professionalism in official communication. They create confidence in the recipient by guaranteeing the document’s authenticity.
- In many cases, digital signatures also help with version control. Digital signatures are traceable to the document versions you attach them to. As such, they make it easier to track changes in documents over time.
-
In most cases, you can sign documents with electronic signatures as long as you meet the usual signature rules.
For instance, to eSign a deed, you must still satisfy formalities like your signature being witnessed.
Electronic signatures are also a more secure option than scribbling down handwritten signatures.
They have built-in authentication, several layers of security, and a digital audit trail that acts as proof of transaction in courts.
-
An electronic signature is considered valid if it is a:
- Typed signature on a document
- Picture of your signature inserted in the appropriate place on a document
- Signature written electronically using a mouse, finger, or ePen
Many courts also accept a typed name at the bottom of an email or a person ticking “I accept” on a website as a valid eSignature.
-
You can now sign a variety of documents electronically, including:
- Contracts (such as sales contracts or employment contracts)
- Government, healthcare, and financial services documents
- Non-Disclosure Agreements
- Age verification documents
- Intellectual property licenses
Some documents can be signed electronically but are subject to specific requirements. For example, to eSign a deed, the signee, and the witness must be physically present in the same room.
